
Addendum - Electrical Equipment |
USB Equipment
|
updated: 2020-02-24 |
 iOptron StarFi provides the Wi-Fi connection capability to the following iOptron telescope mounts:
- iOptron CEM60/CEM60-EC
- iOptron iEQ45/30 w/8407 HC
- iOptron iEQ45 w/8406 HC
- iOptron CEM25/CEM25EC
- iOptron ZEQ25
- iOptron Cube II/CubePro w/8408 HC
- iOptron SmartEQ Pro+
- iOptron SmartEQ/SmartEQ Pro
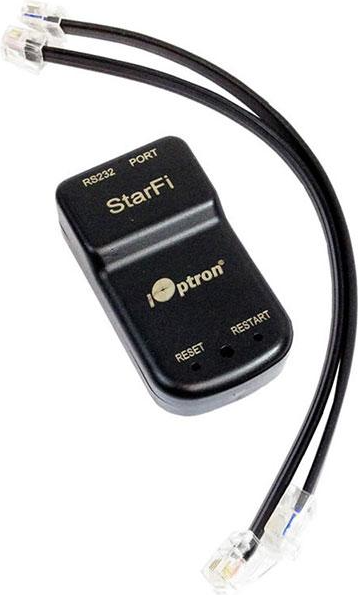
Connecting the iOptron StarFi
- Power the StarFi Adapter
If the mount has an iOptron Port/PORT or a spare HBX port, use the provided 6P6C cable to connect it to the StarFi PORT. This will provide the power to the StarFi. For SmartEQ/SmartEQ Pro/Smart EQ Pro+, a DC power source (12V) with a RJ11 plug (6P4C or 6P6C) is needed to power the StarFi. - Connect the StarFi to a Mount
For iOptron CEM60/CEM60-EC and iOptron iEQ45/30 Pro:
Use the provided 4 pin cable to directly connect the RS232 port from StarFi to RS232 port on the telescope mount.
(for other mounts please check the full documentation).
Set-Up WI-FI Connection
- For a Windows/Mac Operation System Open the Wi-Fi connection panel on your device, Find a Wi-Fi SSID called “StarFi”, then connect.
- Tablet/SmartPhone with iOS Connect the Tablet/SmartPhone to StarFi wireless network.
- Tablet/SmartPhone with Other OS Open the Wi-Fi connection panel on your device, Find a Wi-Fi SSID called “StarFi”, then connect.
Connect the Mount
- Windows
After the computer is connected to the StarFi WIFI network, launch iOptron Commander to connect the mount to your computer via StarFi.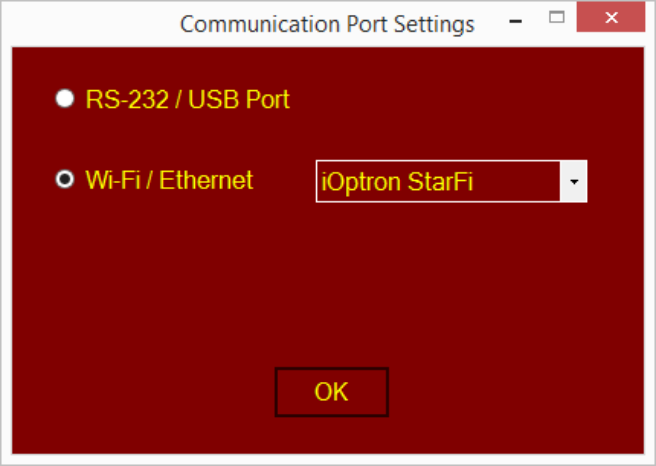
Then you can use your favorite ASCOM compatible software to control the mount. - Tablet/SmartPhone with SkySafari
The App needs be configured first, see WiFi connection with StarFi
StarFi configuration
The StarFi Wi-Fi adapter is shipped with no password protection. You can change the StarFi SSID and enable password protection so only you can make the connection.
To change the StarFi settings:
- Turn on the StarFi adapter by connect it to a mount and turn the mount power on;
- Connect the computer/tablet/SmartPhone to StarFi;
- Open the internet browser and type in http://10.10.100.254;
- A login window will open. Enter “admin” as both User Name and Password;
- Go to AP Settings
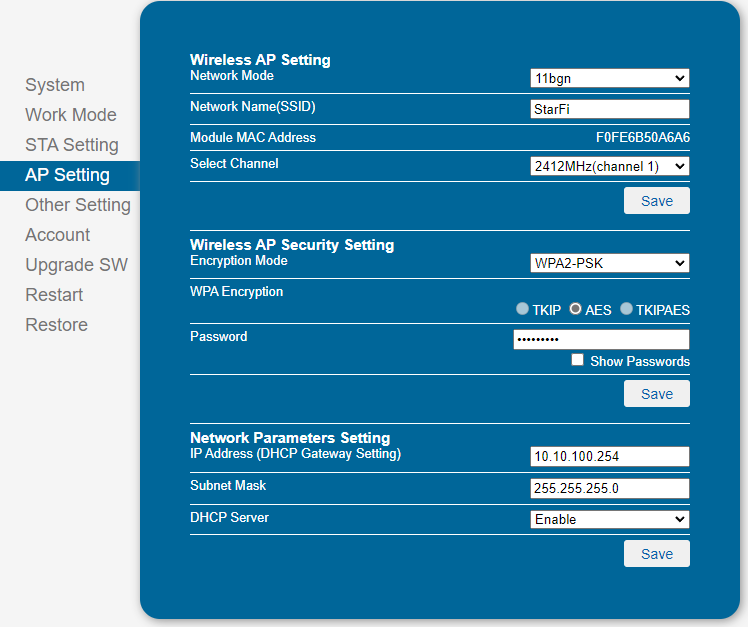
- Now you can change the SSID name from StarFi to Your Name, enable WPA2 encryption, etc.;
- You may also go to account to change login name and password;
- Then restart the StarFi adapter by power off/on the mount or press the RESTART button with a sharp tip, such as a tooth pick, on the StarFi adapter.
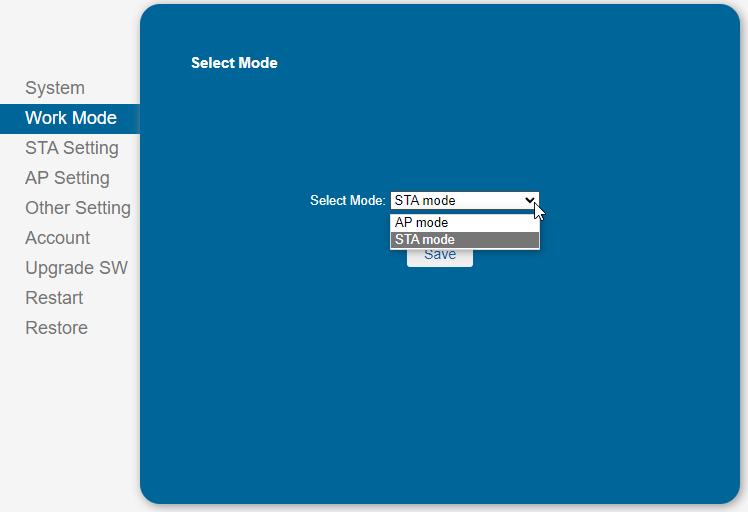
Changing mode to STA (Stationary Access Mode)
- If you are changing to STA (stationary mode), click on Scan to search for your home WiFi, enter the password
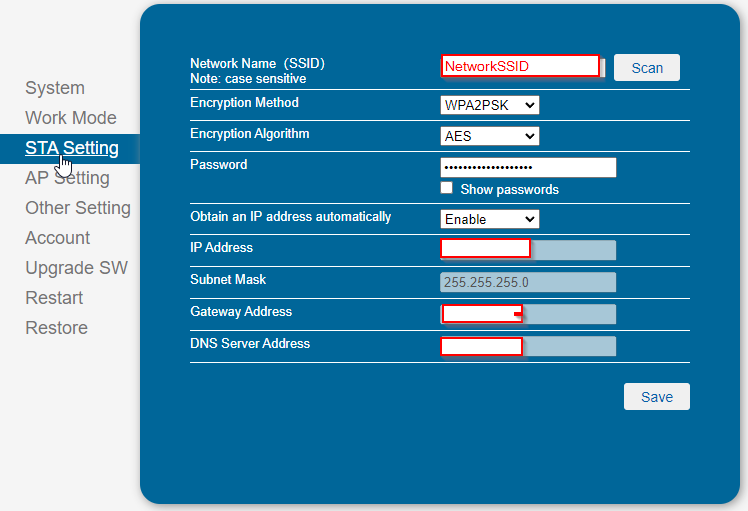
- Then change the Work Mode
- The device will now reboot (or manually disconnect and reconnect the power from the StarFi device)
- On your computer or tablet (to be logged into your home WiFi network) now enter the IP address from the STA settings to reconnect with the StarFi
(either in a browser window to edit the settings or using the iOptron Commander in conjunction with your favorite ASCOM compatible software.
Note:
- Please keep the StarFi at AP (access point) mode if your are not going to use the device at home.
- Reset your StarFi: If ever you forgot your password, use a sharp tip to Press and Hold the RESET button to reset the WI-FI adapter to factory default settings.
See the full StarFi documentation
Created with the Personal Edition of HelpNDoc: Full-featured EPub generator