
Actual Step |
5b: Real Star Collimation with CCD or CMOS Cameras |
updated: 2025-08-19 |
|
Purpose |
In the final stage of the process, the telescope's optics are refined using a real or artificial star in order to restore the well-balanced image of the stars to its original point-like form. This is achieved by eliminating any distortions or elongations that may have occurred during the previous stages of the process. |
|
|
Previous Step |
||
|
Next Step |
||
The main difference to the procedure described in section 5a is the fact that a CCD or CMOS camera is used here instead of eyepieces and the entire collimation of an RC telescope can be carried out with the process described here.
The procedure was fully described by Rich Simmons in the document "A Procedure for Collimating Ritchey‐Chrétien and Other Cassegrain Telescopes by Rich Simons – Deep Sky Instruments", here only some essential points from this document have been emphasized.
In a well-collimated, rotationally symmetric optical system, any resulting images should also be rotationally symmetric. We call this "balanced". In a balanced system, off-axis stars will focus uniformly to produce to produce pinpoint star images. This, of course, is our goal.
The above-mentioned document guides you in great detail through the entire collimation process and should lead to a perfectly collimated system at the end. The collimation steps described here are an excerpt from the article mentioned above.
Collimation Process Overview

Step 1: Camera Orientation Setup
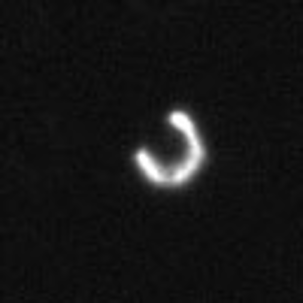
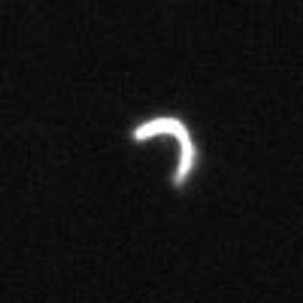
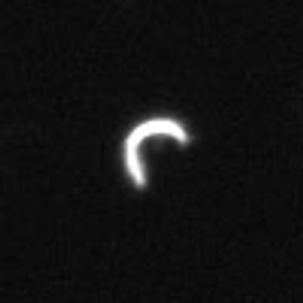
It is important to establish the relationship between the camera's image sensor and the telescope. This relationship is defined by the image of an outside-of-focus star when a quadrant of the telescope's aperture is masked off.
- Point the telescope to a field of stars and set the focuser to a slight out-of-focus position.
- Select a star close to the center of the image.
- Position a aperture mask at different positions in front of the telescope.
- Keep in mind that the mask position is as viewed from the rear of the telescope
- Rotate the camera until the effects correspond with the images below.
|
Mask in Upper Right |
Mask in Upper Left |
Mask in Lower Left |
Mask in Lower Right |
|
|
|
|
|

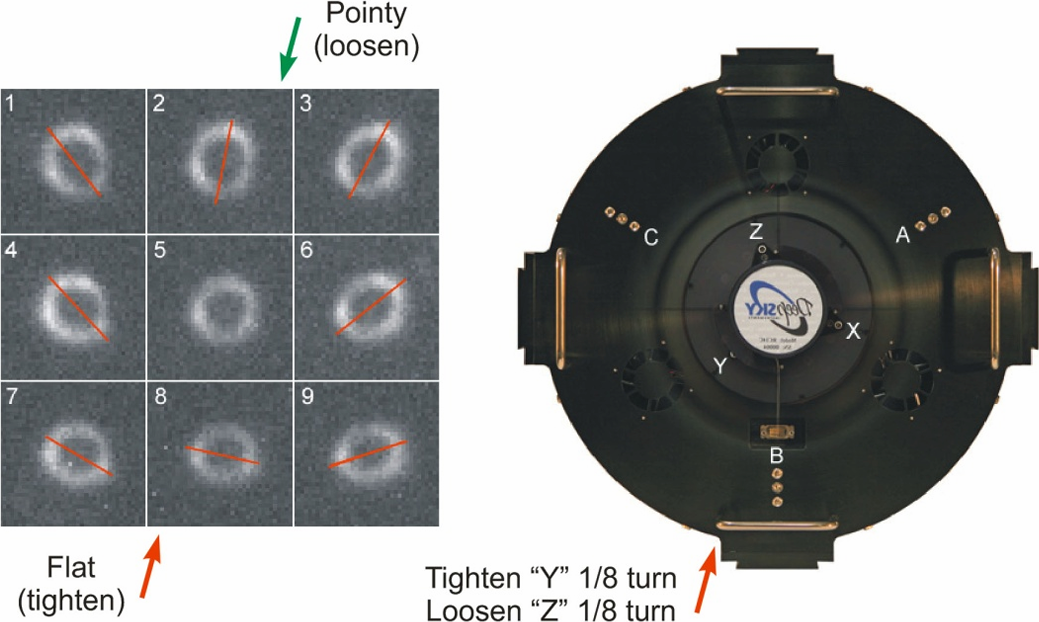
Step 2: Adjust the Primary Mirror to Remove On-Axis-Coma
The following example illustrates the removal of on-axis-coma.
- Select a star that is situated relatively close to the center of the image.
- Adjust the focus so that the image is approximately 50 counts (or steps of the Electronic Automatic Focuser EAF) outside of focus.
- The subsequent images were captured with a one-second exposure, based on the brightness of the selected star. Following each exposure, an adjustment was made to the primary mirror.
- Rule: Tighten the primary pull screw corresponding to the bright side of the image.

The steps to rectify these on-axis coma errors are described in detail in the above-mentioned document.
Step 2: Adjusting the Secondary Mirror to Remove Off-Axis Astigmatism
The secondary mirror is used to remove off‐axis astigmatism and balance the image. This adjustment should be performed afteron-axis-coma has been removed.
Rule: Tighten the secondary pull screw corresponding to the flat stars.
Example of a balanced image:

Example of an unbalanced image:

Some definitions:
- Round Star: Star shape is round.
- Oblong Star: Star shape is oval.
- Pointy Star: Star shape is oval with its major (long) axis pointing towards the center of the image
- Flat Star: Star shape is oval with its minor (short) axis pointing towards the center of the image (lower‐left in this example).

The images on the left were captured with a DSI RC14C astrograph (14.5”, f/7.0, 2557mm) and a Kodak 16803 (9µm x 9µm, 4096x4096) CCD. They are approximately 0.85° x 0.85° in size. The exposure time is ten seconds, though it can range from five to 30 seconds. It is crucial that the mount tracks well and is well polar aligned, as this will affect the quality of the image. It is inadvisable to rely on short exposures for poor polar alignment.
The perimeter stars are no longer round but are more oblong. They are not rotationally symmetrical indicating off‐axis astigmatism. The on‐axis star image 5 is uniformly illuminated indicating no obvious on‐axis coma.
The steps to rectify these off‐axis astigmatism errors are described in detail in the above-mentioned document.
Summary of Collimation Rules
|
Primary Mirror Collimation Rule |
Tighten pull screw corresponding to the bright part of the star image. This will move the stars away from the collimation pull screw being tightened. Use this rule to remove on-axis coma |
|
Secondary Mirror Collimation Rule |
Tighten pull screw corresponding to flat stars. This will move the stars away from the collimation pull screw being tightened. Use this rule to remove off‐axis astigmatism. |
Summary of Conventions
- All references are as seen from back of the scope.
- All out of focus images are taken outside‐of‐focus (roughly 50 counts). Use what works best for you.
- Position camera so the top of images correspond to the top of the scope.
- Tighten “A” means to tighten the pull screw.
- Exposures are five to 30 seconds. Fifteen seconds is typical.
Tips an Tricks
- Defocus enough to see star shapes and characteristics clearly.
- Closer to focus will produce smaller star donuts but more subtle details may be seen.
- Exposures are typically 5~30 seconds to avoid tracking issues.
- Your scope mount must track well and your polar alignment must be good. This is true even for short exposures.
- Shoot a star field in the Milky Way if possible. This will help when balancing your images.
- Be consistent to avoid confusion. Stick to the conventions defined.
- Collimate while pointing at a reasonable elevation (ex. 70 degrees from the horizon.
- Tightening a pull screw at one position is equivalent to loosening a pull screw in the opposite position.
- Secondary adjustments will typically introduce on‐axis on-axis-coma. An equal but opposite adjustment to the primary will typically remove it. This tip can save time once you have the procedure down pat.
- This procedure is most useful for large aperture instruments and wide field cameras.
- Adjusting the collimation screws will change your mirror spacing which changes focus. Large adjustments may require you to adjust your focuser.
- It’s a good idea to collimate your primary mirror with only two of the collimation screw sets. By leaving one unadjusted, you guarantee the mirror will not migrate over time. This also applies to the secondary mirror. We suggest the “B” and “Z” screws be left unadjusted.
- Final collimation should be verified by taking in‐focus images.
- Before spending a lot of time collimating, make sure your scope will hold collimation when pointed to different locations in the sky.
- This procedure provides the best results over the entire imaging field including any tilt that may exist in the optical train. If a rotator is used, you will want to remove any relative tilt between the camera and the rotator.
- As you get closer to optimum collimation, other minor issues with the scope and/or mount will have a greater effect. A more critical eye may be required. Evaluating your images closer to focus may also help.
- Focused images that exhibit elongated stars only on one side of an image are generally not optimally collimated and can be improved upon.
- Images that are balanced but still contain artifacts may have other issues such as the mount, optics, tracking or polar alignment.
- Collimation adjustments will change your focus. You might need to adjust focus if your collimation adjustments are large.
- The procedure takes about ten to fifteen minutes once you become proficient.
- Much of the time spent collimating a scope is waiting for images to download. Using binning and area‐of‐interest to locate and image on‐axis stars when collimating the primary can help save time.
- If you document your collimation adjustments, you can get back to a known state if necessary.
Courtesy photos and text by A Procedure for Collimating Ritchey‐Chrétien and Other Cassegrain Telescopes by Rich Simons – Deep Sky Instruments
See also:
. . . . . . . .
Created with the Personal Edition of HelpNDoc: Write eBooks for the Kindle