
|
Astro Photography |
Introduction: About Astrophotography |
updated: 2025-07-14 |
Thanks to the amazing digital photography we have today, the availability of computers, even in miniature formats, and the incredible software and apps associated with them, the opportunities for getting started in astrophotography have improved so much.
There are two basic approaches to astrophotography:
- Individual shots of the moon, the starry sky, entire constellations, the Milky Way, or comets can be taken with any DSLM or bridge camera. In some cases, the cameras in modern smartphones already achieve amazing results. See the "Astrophotography for Beginners" in the next section.
- Taking detailed pictures of the moon, planets, or deep-sky objects (DSO) using long telephoto lenses or telescopes requires a different approach. It involves using special electronic equipment for image control and automatic tracking. This method is referred to as Electronically Assisted Astronomy (EAA) and will be discussed in later chapters of this guide.
What's the difference between digital and analog astro-photography?
In the domain of analog photography, the relationship between film sensitivity and long exposures is non-linear. It is generally known that doubling the exposure time should result in a corresponding increase in the amount of light captured. However, in the context of analog film, this phenomenon becomes evident beyond a few seconds. [1] This is called the Reciprocity Failure.
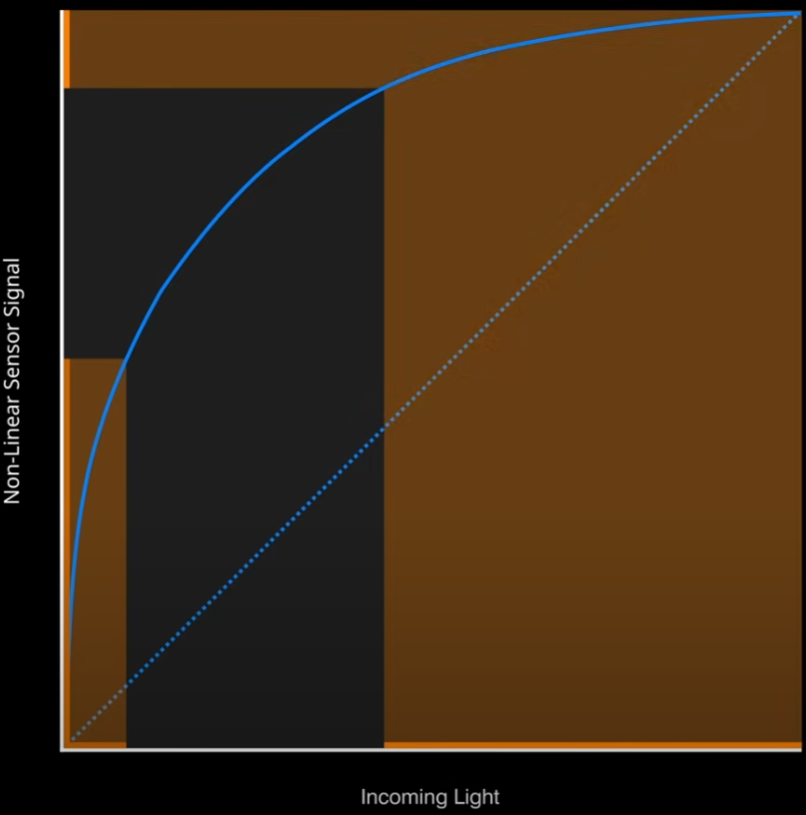
Given the non-linear behavior exhibited by the eye, which manifests as a limited sensitivity to low light, our visual experience differs significantly from that obtained through a digital sensor. Furthermore, it is not possible to take “long exposures” with the eye; the typical “exposure time” of an eye is between 1/15 and 1/60 seconds, and the eye can process images at a rate of 10-12 frames per second.
This means that very faint objects can only be seen with great difficulty or photographed with analog film.
This is different from the almost perfect linear behavior of modern digital CMOS-sensors, such as those used in smartphones, DSLMs, or special astro cameras (see this PixInsight video about Linear Images on YouTube for more details).
|
CMOS Sensor Sensivity |
Naked Eye Sensivity |
|
|
|
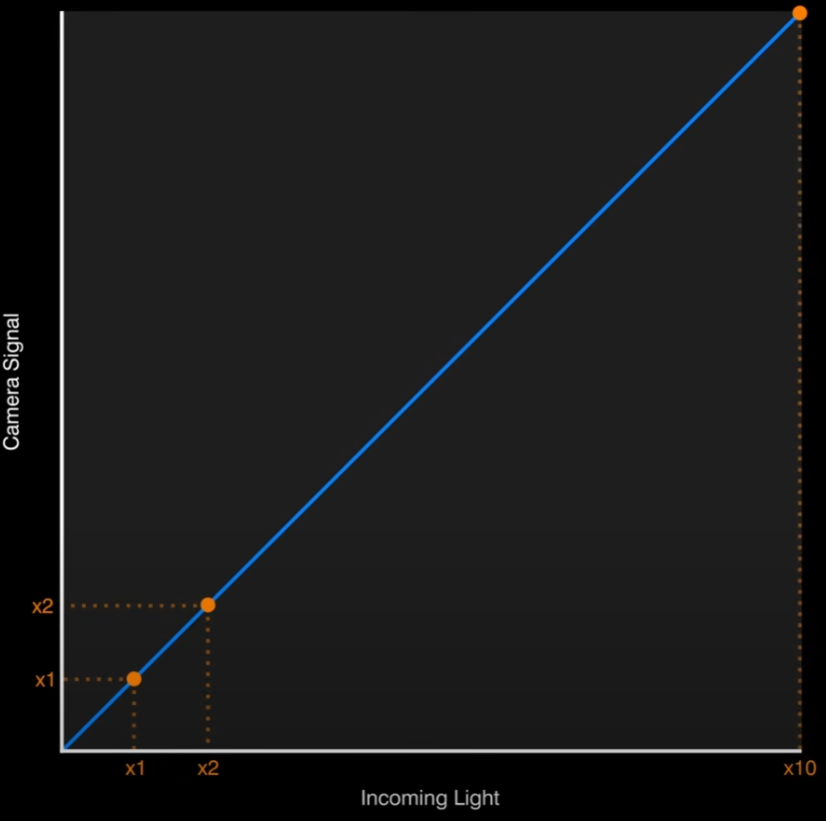
Ref.: PixInsight - Linear Images on YouTube
A CMOS-sensor is basically nothing more than a photon counter, and due to its linearity, which does not correspond to the subjective non-linearity of the eye, undeveloped photos taken with such a sensor appear dark and colorless.
Therefore, all digitally captured photos (typically in RAW format) still need to be developed to match the visual perception of the human eye, which is done automatically by smartphones or DSLM or DSLR cameras. The final picture format of a DSLM or smartphone is typically a JPG file, which we are all familiar with.
This post-processing is an essential step in astrophotography and is described in this guide in the chapter on De-Linearization with PixInsight.
If you want to find out more or get inspired, you can check out some of the following websites:
- In 8 Schritten vom Astrofotografie-Anfänger zum Profi - Anleitung & Tipps (hobbeasy.de)
- Astrophotography for beginners (astroshop.eu)
- Astrofotografie 1: Die Grundlagen - Online-Fotokurs der fotocommunity Fotoschule
- Astrophotography for beginners - Adobe
- Linear Images on YouTube
[1] One big exception to this is the Fuji Acros 100 for no reciprocity failure up to 2 minutes - a unicorn in the analog world!
Created with the Personal Edition of HelpNDoc: Full-featured EBook editor