Preparation

Warning:
- It is recommended that one of the collimation screws (e.g. the "Y" screw) be maintained in its current state, thus maintaining the mirror in its current position and changes in mirror spacing are avoided.
- It is also recommended not to touch the central locking screw on the second mirror, as this can cause the mirror to be completely out of alignment.
- In contrast to the note on the picture above, it is sometimes necessary to slightly loosen the central screw with a Philips screwdriver in order to tighten the X and Z screws - please only do this very carefully and then immediately retighten the X or Z screw to be tightened again (clockwise rotation).
- However, it is always safer to loosen only one of the locking screws to allow the other two to move freely
|
Preparation
- Place the optical tube on a table or move the telescope on the mount into a horizontal position.
- If possible remove the internal baffle on the main mirror that blocks obliquely incident light (this is possible e.g. on the TSO 203/1624 RC PRO)
- Move the focuser to a position where the distance to the sensor plane is similar to the distance to the surface of the TSRKOLLI Collimator (e.g., 9200 EAF steps / 27 mm), as this affects the the calibration
- Now put the TSRKOLLI into the 2" receptacle of your focuser. Press your hand slightly from the backside against the collimator. Now you are ensured that the collimator is optimally placed in the focuser. Tighten the collimation screws slightly. This will ensure that the collimator is optimally positioned in the focuser.
- Use a lightpad or a backlit white sheet of paper in front of the telescope to make the details inside the telescope visible
- Carefully loosen 2 of the 3 locking screws on the primary mirror (e.g. screws X and Z) using a 2.5mm Allen key, but under no circumstances loosen the 3rd screw Y, in order to prevent the mirror from shifting laterally.
|
|

|
Example of a Misaligned Secondary Mirror
|
|
Procedure
|
- Use the 4mm Allen wrench on the 2 push/pull adjustment screws X and Z of the secondary mirror to move the black spot to the center.
- When finished , carefully retighten the center screw if necessary.
|
|

|
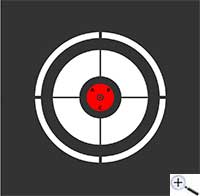
Well Aligned Secondary Mirror
When the adjustment is complete, the black dot should be right in the center of the red circle.
|
Finalization
|
When finished, carefully try to retighten the center screw if necessary. Check that the mirror is still in place.
|
Next Step
|
Step 4: Adjusting the Primary Mirror
|
Created with the Personal Edition of HelpNDoc: Don't be left in the past: convert your WinHelp HLP help files to CHM with HelpNDoc
