Actual Step

Step 3: Collimating the Secondary Mirror

updated: 2024-04-16

Purpose

Aligning the secondary mirror with the optical axis of the telescope

Previous Step

Step 2: Check and correct Mirror Spacing

Next Step

Step 3a: 2nd Mirror Collimation using a TSRKOLLI Collimator
or

Step 3b: 2nd Mirror Collimation using OCAL


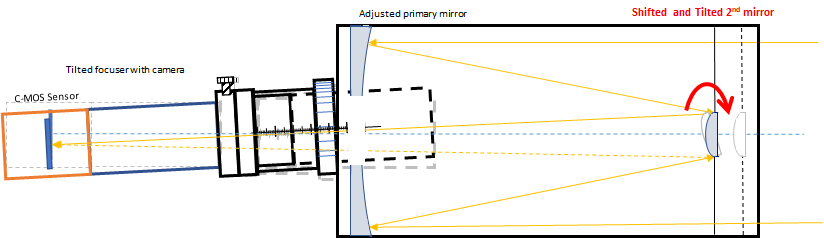
Secondary Mirror Collimation using a Laser Collimator for Newtonians and STCs (Schmidt Cassegrains), not applicable to RCTs

Preparation

It is better not to touch the central locking screw on the second mirror, as this can cause a total misalignment of the mirror. 

However, if all 3 adjusting screws are very tight, the central locking screw can be loosened very carefully with a Phillips screwdriver. However, it is always safer to loosen only one of the screws to allow the other two screws to move.


Then use the 4mm Allen wrench on the 3 push/pull adjustment screws to move the black spot to the center.


When finished, carefully retighten the center screw if necessary.

Adjusting the Secondary Mirror 

  • Observe the 45-degree faceplate on the laser collimator and look for the expanded laser dot projecting onto the target grating. 
  • For Initial Setup: Mark the center of the laser beam on the target grating. Then you are ready for future collimation. 
  • Using the appropriate screwdriver or knobs, adjust the alignment screw on the secondary mirror mount until the center of the expanded laser dot is centered at the marked position. Your telescope is now collimated.
  • For details see: Hotech Collimator Intruction Sheet 

Created with the Personal Edition of HelpNDoc: Easy to use tool to create HTML Help files and Help web sites