This method is not very accurate and is highly dependent on the angle of view through the collimator.

|
Preparation
- Place the optical tube on a table or move the telescope on the mount into a horizontal position.
- If possible remove the internal baffle on the main mirror that blocks obliquely incident light (this is possible e.g. on the TSO 203/1624 RC PRO)
- Move the focuser to a position where the distance to the sensor plane is similar to the distance to the surface of the TSRKOLLI Collimator (e.g., 9200 EAF steps / 27 mm), as this affects the the calibration
- Now put the TSRKOLLI into the 2" receptacle of your focuser. Press your hand slightly from the backside against the collimator. Now you are ensured that the collimator is optimally placed in the focuser.
- Use a lightpad or a backlit white sheet of paper in front of the telescope to make the details inside the telescope visible
- Carefully loosen 2 of the 3 locking or fixation screws on the primary mirror (e.g. screws A and C) using a 2.5mm Allen key, but under no circumstances loosen the 3rd screw B, in order to prevent the mirror from shifting laterally.
- Next, switch on the collimator in Newtonian/reflector mode (red LEDs)
|
|

|
- It is recommended that one of the collimation screws, e.g. the "B" screw, be maintained in its current state, thus maintaining the mirror in its current position and changes in mirror spacing are avoided.
|

|
- I used a small Nikon S9900 instead of using the TS RCKOLLI - the lens tube fits exactly into a 2" receptacle
- WARNING: ensure, that the camera doesn't shut down during the process as it will try to retract the lens tube and therefore might drop off the focuser!)
|
|

|
Misaligned Primary Mirror
- looking though the hole of the TS RCKOLLI
- Here you can see a misaligned primary mirror, this is shown by the unequally wide outer white border.
|
|

|
Misaligned Primary Mirror
- photo shot with the Nikon S9900 setup (above)
|
|
|
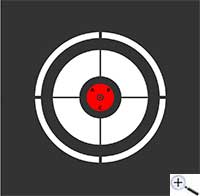
Well Aligned Primary Mirror
- Now you center the outer ring by adjusting the primary mirror using a 3 mm Allen keys on the silver push/pull screws.
- The result at the end of this second and last step of the collimation should look like this. Collimation is finished and the telescope is ready for the night.
|

|
Well Aligned Primary Mirror
- photo shot with the Nikon S9900 setup (above)
|
Finalization
|
- Re tighten the locking screws slightly to prevents that the pressure on the cell gets too strong or that the mirror position remains unstable.
- Re-install the internal baffle on the main mirror.
|
Next Step
|
Step 2: Collimation of the Secondary Mirror
|
Created with the Personal Edition of HelpNDoc: Why Microsoft Word Isn't Cut Out for Documentation: The Benefits of a Help Authoring Tool
