
|
PixInsight |
Optional: |
updated: 2026-04-03 |
|
Purpose |
To bring more (false!) color into the image |
|
Activation |
Main step: Script > Toolbox > CreateHubblePaletteFromOSC |
|
Input |
any still linear, denoised star-less image from an OSC color camera |
|
Output |
a linear color image in false colors depending on the selected palette |
|
Next Steps |
|
|
Download from |
|
|
Resources |
General Description
The basic idea how to apply a Hubble palette to a one-shot color (OSC) image in PixInsight is to split the color image according to the wavelengths of the three important frequencies found in typical emission or reflection clouds.
|
Element |
Associated Color |
Wavelength [nm] |
|
SII (Sulfur) |
Red |
672 |
|
Ha (or Hα, H-Alpha) |
Green |
656 |
|
OIII (Oxygen) |
Blue |
496 |
This can be done using the scripts available in PixInsight or online. These scripts split the images and, in the case of CreateHubblePaletteFromOSC, recombine the three separate black-and-white images at the end, followed by color adjustments (using e.g. the Curves Transformation process).
- Pre-processing and Data Acquisition (Implied)
- Narrowband Filters:
The ideal scenario for a Hubble palette is using separate H-alpha (Ha) and OIII filters with a monochrome camera, which are then combined into a SHO (or HOO,...) palette.
- OSC Data:
For a single-shot color (OSC) camera, the normalization scripts are designed to extract an approximation of H-alpha and OIII data from your broadband RGB image.
NOTE: The usage of narrow-band filters, such as the dual-band Optolong L-eXtreme filter, when shooting light frames, may lead to unwanted effects. This filter suppresses all wavelengths except Hα and OIII, blocking the SII wavelength.
Processing steps
- Start with the starless image from step 6
|
Starless Image (identifier: Cloud, postfix: *_Cloud_HT_CT) |
|
|
- Apply a Normalization Script
Many scripts are available online that support this wavelength-based normalization.
Available Scripts:
|
Script |
Where? |
|
CreateHubblePaletteFromOSC provides different normalization options: |
Script > Toolbox > CreateHubblePaletteFromOSC |
|
HOONormalization_V8 |
Download from: |
|
SHONormalization_V8 |
|
|
HSONormalization_V8 |
|
|
HOSNormalization_V8 |
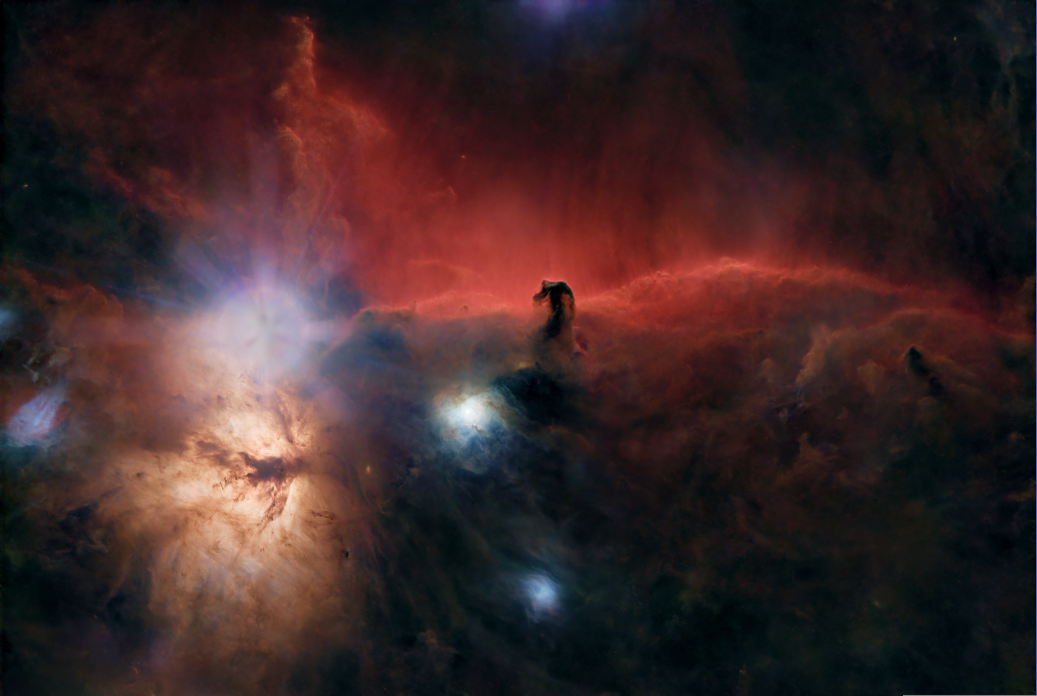
Example: Using the HOSNormalization_V8
|
Script HOSNormalization_V8 |
Resulting Image |
|
/* Normalize HOS data with Pixelmath - V8 by Bill Blanshan and Mike Cranfield */
Mode= 1 ; //<-- Data type, 0: linear, 1: Non-linear Lightness= 1 ; //<-- 0=OFF, 1=Original, 2=Ha, 3=SII, 4=OIII SCNR= 1 ; //<-- 0=OFF, 1=On Blackpoint= 1.00 ; //<-- Blackpoint range (0 to 1= min to med) SIIBoost= 1.00 ; //<-- Increase to boost SII OIIIBoost= 1.00 ; //<-- Increase to boost OIII HLRecover= 1.00 ; //<-- If highlights are clipped, increase >1 HLReduction= 1.00 ; //<-- If highlights are too bright, increase >1 Brightness= 1.00 ; //<-- Increase to stretch image /* Drag the bottom left arrow over to your HOS image |
|
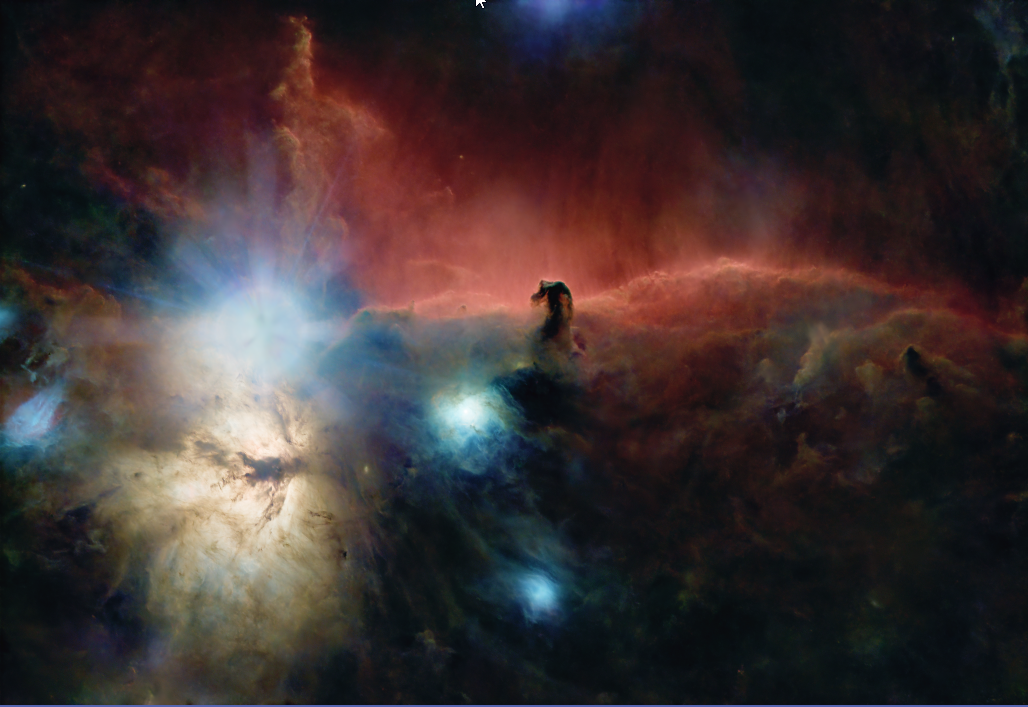
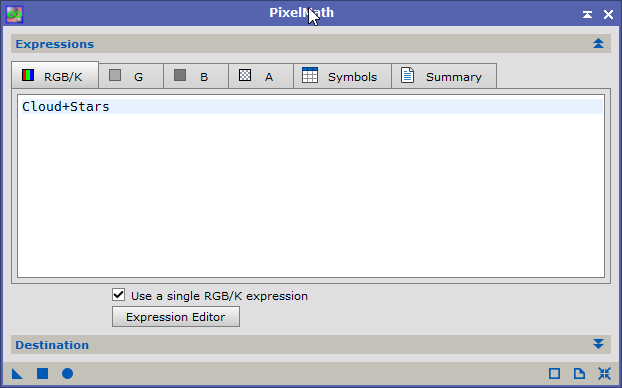
- Add Stars to Cloud image with PixelMath (save to *_MASTER_BX_NX_GX_HOS_Stars+Cloud)
|
PixelMath |
Resulting De-linearized (stretched) Image |
|
|
|

.
V7 update Notes and Instructions:
Notes: In this release, we simplified the normalization process plus giving you the option to normalize linear and non-linear images. It is still recommended this process be performed on a starless image as the normalization process can hurt the star color. Also, we are converting the image from RGB to the LAB color space which offers better lighting control. By using the "Lightness" of the original image or the Lightness from the Ha data, helps maintain color and brightness control far better than when using luminance as done in Version 5. The downside is,the Lightness feature only works on non-linear images.
1) Mode: When processing linear data (unstretched), select mode:0. When processing none-linear data, select mode:1. The advantage of processing in linear state is you can stretch the data afterwards using a linked or un-linked stretch to give you different appearances. The downside is, you cannot use the Lightness feature as it only works on non-linear images (Mode:1).
2) Lightness: The advantage of using Lightness is to help control color and brightness better within the LAB color space. It is also good for showing off more detail i.e. if Ha "2" mode is used, you will see detail within the Ha regions of the image. When Lightness feature is set to Off "0", the produced image has no Lightness correction. When set to "1", the produced image using the original image Lightness. This feature is only available for Non-Linear images.
3) SCNR: When On, any green cast will be removed while retaining its luminance
4) Blackpoint: This feature allows you to control where normalization turn on in the blackpoint zone. This is an interpolation between the minimum and median image values, so a Blackpoint of 0 will begin the normalization after the minimum image value. A value of 1 will do the same but starts the normalization after the median image value. Any value can be used between 0 and 1 e.g. 0.85. This feature helps allow fainter signals to be normalized but subsequently can allow for more noise.
5) OIII & SIIBoost: These feature allows you to boost or reduce more OIII/SII signal into your image. a value greater than 1 will boost and a value less than 1 will reduce. It is unlikely you will need to use this but I gave you the option just in case.
6) HLRecover: This features is a linear rescaling method to help recover highlights in case they have been clipped. The default value is 1, so if you run this normalization process and your image is clipped, you can increase this value to unclip the image e.g. a value of 1.1 or 1.2 might be ok. Always leave at value 1 unless you need to recover clipped data.
8) HLReduction: This feature is a reversed curve stretch on the highlights alone. example, the Rosette nebula has a bright core. You can use this method by increasing the value to greater than 1 to help reduce the highlights while keeping your shadows the same. This method can also work in reverse, meaning, you can reduce this value to increase highlights ;-)
9) Brightness: This is the final step within this pixelmath script. This feature will perform a curve stretch to increase overall brightness of the image with a value greater than 1. A value less than 1 will reduce brightness but should not be used to regain clipping, that should be done using the HLRecover feature.
Notes:
1) It is suggested to run normalization on a starless image. An image with stars will can result in severely discolored stars after normalization.
2) Regarding stretching of normalized "linear" data, it is recommended to use a linked stretch, such as GHS, EZ Soft Stretch, or my pixelmath stretch scripts.
If you plan on performing normalization on an image in a non-linear state and are using my pixelmath scripts, it is best to use the unlinked stretch as this will also help with boosting OIII/SII signals. Otherwise, please use GHS, EZ Soft Stretch or my pixelmath script.
Also, don't over stretch your image! This can happen when using stretching scripts/maths if the image has been denoised in the linear stage. So please control your stretching :-)
3) Make sure your starless image is background neutralized! When performing this on a non-linear image, and using the BackgroundNeutralization process, it is best to set the BackgroundNeutralization Upper limit value to a
value higher than your background reading. Then set the working mode to "Target Background" and use a value to your liking e.g. 0.150. This helps give good results for normalization.
4) Preferred method for adding the stars back is using our "Screen Stars" script, or my RGB to Narrowband pixelmath so that star color is preserved.
*/
M= (min($T)+Blackpoint*(med($T)-min($T))/1);
E0= adev($T)/1.2533 + mean($T) - M;
A0= E0/~M[1];
E1= (A0[1]*(1-A0[0])/(A0[1] - 2*A0[1]*A0[0] + A0[0]))/OIIIBoost;
E2= rescale($T[1], M[1],1);
E3 = ~(~mtf(E1, E2) * ~min($T[1], M[1]));
A1= E0/~M[2];
E4= (A0[2]*(1-A0[0])/(A0[2] - 2*A0[2]*A0[0] + A0[0]))/SIIBoost;
E5= rescale($T[2], M[2],1);
E6 = ~(~mtf(E1, E5) * ~min($T[2], M[2]));
R= $T[0];
G= iif(SCNR==0,E3,min(mean($T[0],E6),E3));
B= E6;
R1= iif(R>0.04045, ((R+0.055)/1.055)^ 2.4,R/ 12.92);
G1= iif(G>0.04045, ((G+0.055)/1.055)^ 2.4,G/ 12.92);
B1= iif(B>0.04045, ((B+0.055)/1.055)^ 2.4,B/ 12.92);
X= ((R1*0.4360747) + (G1*0.3850649) + (B1*0.1430804));
Y= ((R1*0.2225045) + (G1*0.7168786) + (B1*0.0606169));
Z= ((R1*0.0139322) + (G1*0.0971045) + (B1*0.7141733));
X1= iif(X>0.008856, X^(1/3),(7.787*X)+(16/116) );
Y1= iif(Y>0.008856, Y^(1/3),(7.787*Y)+(16/116) );
Z1= iif(Z>0.008856, Z^(1/3),(7.787*Z)+(16/116) );
L= 116*Y1-16;
a= (500*(X1-Y1));
b= (200*(Y1-Z1));
Y2= iswitch(Lightness==0,(L+16)/116,
Lightness==1,(CIEL($T)+.16)/1.16,
Lightness==2,($T[0]+.16)/1.16,
Lightness==3,($T[2]+.16)/1.16, ($T[1]+.16)/1.16);
X2= (a/500)+Y2;
Z2= Y2-(b/200);
X3= iif(X2>0.008856, X2^3,(X2-16/116)/7.787);
Y3= iif(Y2>0.008856, Y2^3,(Y2-16/116)/7.787);
Z3= iif(Z2>0.008856, Z2^3,(Z2-16/116)/7.787);
R2= ((X3* 3.1338561) + (Y3*-1.6168667) + (Z3*-0.4906146));
G2= ((X3*-0.9787684) + (Y3* 1.9161415) + (Z3* 0.0334540));
B2= ((X3* 0.0719453) + (Y3*-0.2289914) + (Z3* 1.4052427));
R3= iif(R2>0.0031308, 1.055*(R2^(1/2.4))-0.055,12.92*R2);
G3= iif(G2>0.0031308, 1.055*(G2^(1/2.4))-0.055,12.92*G2);
B3= iif(B2>0.0031308, 1.055*(B2^(1/2.4))-0.055,12.92*B2);
E10= iif(Mode==0,iif($T==$T[0],R,iif($T==$T[1],G,B)),
iif($T==$T[0],R3,iif($T==$T[1],G3,B3)) );
E11= (mtf(~(1/HLReduction*.5),E10)*E10)+(E10*~E10);
E12= mtf((1/Brightness*.5),E11);
E13= rescale(E12,0,HLRecover);
E13
Created with the Personal Edition of HelpNDoc: Transform Your Help Documentation Process with a Help Authoring Tool