ASIAIR based workflow

Shooting Calibration Frames using the ASIAIR Live Stacking Mode

updated: 2023-07-03


There are different options how calibration frames like Dark, Light, Flat and Bias frames can be captured using the ASIAIR. (see also Dark, Flat, and Bias Frames with the ASIAir Pro on YouTube). However the easiest way to generate calibration frames on the ASIAIR is using the Live plan feature, as this process not only shoots the frames, but also combines them into a master files.


Calibration frames can also be captured using Autorun or Plan Mode, but in this case you need to use an image integration tool like in PixInsight to combine all captured calibration frames into one master bias frame and rename it to e.g. "Master_Bias100_1.0ms_gain120.FIT" or .XFIT). 


Also be aware, that no fully automated capturing process is possible as calibration frames always require manual interaction (covering the scope or camera for dark and bias frame or pointing the scope to a uniform white or gray background for flat frames.


Procedure

click on the images to open in higher resolution

ASIAIR Video Main Screen

To open the Live Stacking  function, select Live on the ASIAIR right side menu on the main screen 

Capturing Bias Master Frames: Select Bias on the live stacking menu.


Bias Frames don't require use of a filter, but need to be taken in an environment that does not allow light to hit the camera sensor (if you have light leaks, you can wrap dark foil to wrap around the telescope parts). 


It is acceptable to take these frames and build a library (such that you don't need to take them every imaging session.


Important

  • Cover your camera: your camera or scope must be covered to block all light off the sensor
  • Set GAIN or ISO to the same setting as the light frames you want to calibrate 
  • Temperature of the camera should be identical as during the light frame shooting (so that the sensor generates the same amount of noise). If the camera can be cooled, then just set the camera temperature to the same value used by the light frames. If it's a DSLR without cooling, then you should shoot the bias frames directly after or before capturing the light frames, assuming the outside temperature didn't change much.
  • Exposure time must be set to the minimum possible time for the camera (or 0 if available).
  • No. of frames: take a lot of bias frames, the more you have, the better the result (typically around 100)
  • Bias frames can be taken any time as long the the above parameters match the requirements
  • Re-usability: Bias frames can be reused as long as they match the same gain and temperature values
  • Bias Master Library: you can combine (stack) all bias frames of a distinct gain and temperature value into Master calibration frames that can be reused during the picture post-processing steps or for ASIAIR Live stacking plans. Make sure the file name of such a master file includes the string "master" to be recognized by PixInsight as a master file.


Capturing Dark Master Frames: Select Dark on the live stacking menu

Important

  • Cover your camera: your camera or scope must be covered to block all light off the sensor
  • GAIN must be set to an identical value as the light frames you want to calibrate
  • Exposure time must be the same as for the light frames
  • No. of Dark frames: they require a lot of time, so taking about 20 Dark Frames is typically enough
  • Temperature of the camera should be identical as during the light frame shooting (so that the sensor generates the same amount of noise)
  • Dark frames can be taken any time as long the the above parameters match the requirements
  • Dark frames can be reused as long as they match the same gain, temperature and exposure time values


They don't require use of a filter, but need to be taken in an environment that does not allow light to hit the CCD (if you have light leaks, you can use foil to wrap around the nose). 


Furthermore, most dark frames are taken at the same exposure length and temperature as the corresponding light frames (some image processing applications can scale darks to any exposure length). It is acceptable to take these frames and build a library (such that you don't need to take

them every imaging session.


Capturing Flat Master Frames: Select Flat on the live stacking menu

  • These frames should be taken during every imaging session because they depend on the alignment of the entire imaging train. 
  • Flat frames normally target a mean ADU of 22,000 to 25,000, but this will depend on camera and user preference. 
  • If your flats data is defined (per filter), selecting a flats event will automatically populate the saved exposure time (for the selected binning).


Important

  • GAIN must be set to an identical value as the light frames you want to calibrate
  • Exposure mus be set to Auto to get good results
  • Filters: If filters have been used you need a set of Flat Frames for every filter
  • Focal Length of the optical equipment must be the same as for the light frames
  • Focus must be identical as for the light frames
  • Temperature:  no temperature requirements
  • No. of Flat frames: typically the same amount of flats as light frames (but 20 photos are typically enough)
  • Use a evenly-lit light source, e.g. twilight sky, laptop screen, light panel, light box, TV screen, a white T-shirt to cover your telescope  or similar.


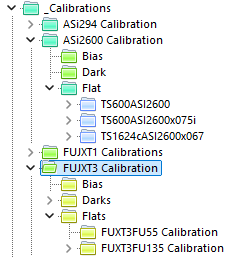
Organize your Calibration Frames for later usage

Move the calibration frames to a folder on the CF-card od USD Drive called e.g. Master so that you can easily retrieve them later during the light frame planning. All master frames have Binning=1 and Gain=120, so these 2 markers have been omitted from the filenames. Temperature is normally -10°C, only deviating temperatures are shown 


  • USB Drive or CF-Card
    • MastersASI294
      • Bias (by Gain and temperature)
        • MasterBias50_1.0ms_T23.5C_DATE.fit
        • MasterBias50_1.0ms_DATE.fit
      • Dark (by Gain, exposure time and temperature)
        • MasterDark20_010.0s_T23.5C_DATE.fit
        • MasterDark20_010.0s_DATE.fit
        • MasterDark20_030.0s_DATE.fit
        • MasterDark20_060.0s_DATE.fit
        • MasterDark20_180.0s_DATE.fit
        • MasterDark20_300.0s_DATE.fit
      • Flat (by Config, Gain and filter)
        • TS1624rAS294
          • MasterFlat20_TS1624rAS294_NONE_DATE.fit
          • MasterFlat20_TS1624rAS294_UCH2_DATE.fit
          • MasterFlat20_TS1624rAS294_ClearSky_DATE.fit
          • MasterFlat20_TS1624rAS294_UVIR_DATE.fit
          • MasterFlat20_TS1624rAS294_OIII_DATE.fit
        • TS600AS294
          • MasterFlat20_TS600AS294_NONE_DATE.fit
          • ...
    • MastersFUXT3
      • Bias
      • Dark
      • Flat...
        • TS1624rFUXT3
        • TS600FUXT3
          • ...


If you are using PixInsight for image calibration and integration, then the file name of the Master Calibration Frames must contain the word "Master" in order to be accepted by PixInsight  (e.g.: "Master_Bias20_1.0ms_gain120.FIT" or .XFIT) 


Created with the Personal Edition of HelpNDoc: Transform your help documentation into a stunning website