
Actual Step |
Full SkyWatcher EQ6R-PRO Preparation for Full Feature Mode |
updated: 2023-11-13 |
Steps to connect to a SkyWatcher EQ6R-PRO in Full Feature Mode
 IMPORTANT:
- Please note that if you have to turn off the mount for any reason during the calibration process, you will need to restart the entire process, as not all settings will be available after a restart.
- Check the quality of the WiFi connection between your tablet or cell phone and the ASIAIR. If the connection is slow, the polar alignment and GoTo commands will fail because the mount positions will not be properly communicated to the ASIAIR.
- Make sure your mount is leveled
- Connect a GPS module (recommended!) to the Multi-Purpose Port of the SynScan Hand Controller
- Turn on the mount with the hand controller connected to the mount
- Use following procedure on the SynScan Hand Controller:
- With a GPS module connected:
- set the correct time zone ( e.g. +0.00h for the Canary Islands (= UTC) or +01.00h for central Europe)
- set DST Daylight Saving = YES [ENTER] (depending on your location and time zone), this information will be overwritten later in the process
- Continue with step 6.1 (location and date/time questions will be skipped)
- Disconnect the GPS module from the auxiliary port of the hand controller
- If no GPS module is connected, you will start here:
- Start from Park 2 [NO]: Select this option If the mount was moved between sessions or if no GoTo Park Position was saved before turning off the mount. WARNING: Try not yet to connect a computer or the ASIAIR to the mount because a RS232 control of the mount is only possible in Full Feature Mode (see above), otherwise SynScan will block the computer connection.
Next SynScan will ask for:
- SynScan Version: 4.38.06 or later [ENTER]
- Confirm the warning with [ENTER
- Enter Longitude, Latitude, Time Zone settings and Elevation: unless you are using a GPS module.
- Confirm Date (whatever it displays, this will be replaced later)
- Confirm Time (whatever it displays, this will be replaced later)
- DST Daylight Saving = YES [ENTER] (depending on your location and time zone)
- Make sure your mount is leveled
- Do a visual Polar Alignment. There are two approaches available for the Polar Alignment:
- using the polar scope of the EQ6R-Pro and the SynScan Polaris information and/or analog to the information described in the section Visual Polar Alignment.
- Alternatively you can also start ASIAIR Pro with the cameras activated and use the Polar Alignment function of the ASIAIR PRO. This may require a new focusing of the cameras.
IMPORTANT: Do not enable the connection between the ASIAIR and the scope yet, use the Manuel Scope setting in the Polar Alignment instead.
The advantage of this ASIAIR based Polar Alignment is the high accuracy obtained during this alignment that can even eliminate the requirement for a more than 1-star alignment afterwards.
- Perform a 3-Star Alignment (or a 1-star alignment if the instrument seems to be well calibrated) using the GoTo functions of the SynScan controller - do not use the ASIAIR for this step!
- Start from Park 1 [YES]:If you want to restart from Park Position you will continue here. This is only recommended if the mount was not moved at all!Be aware that if you answered with [1] (Start from Park) but have moved since the last session, you will need a new polar and star alignment. If this requirement can be replaced by the Polar Alignment and GoTo Auto Center (plate solving) function of the ASIAIR still needs to be tested
- SynScan Version: 4.38.06 or later [ENTER]
- Confirm the warning with [ENTER]
- Confirm Date (whatever it displays, this will be replaced later)
- Confirm Time (whatever it displays, this will be replaced later)
- IMPORTANT for operation with ASIAIR: set DST Daylight Saving = NO [ENTER]
- At the end you should see the Choose Menu in the SynScan display
- At the end you should see the Choose Menu in the SynScan display
- DO NOT TURN OFF THE POWER (or you will have to re-start from the beginning)
- Connect the ASIAIR PRO as described in the RS232-Connection via Hand Controller. To connect the RS232 cable, use the Multi-Purpose Port of the Hand Controller.
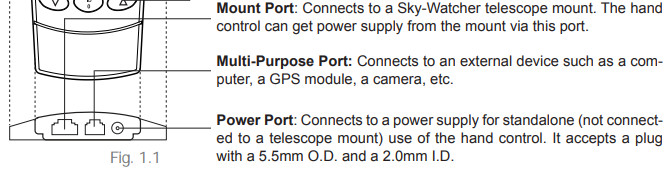
- IMPORTANT: make sure DST Daylight Saving is set to NO on the SynScan Hand Controller before proceeding to connect the ASIAIR PRO (important setting for ASIAIR). (On the SynScan HC use Menu > Setup Mode > Daylight Saving)
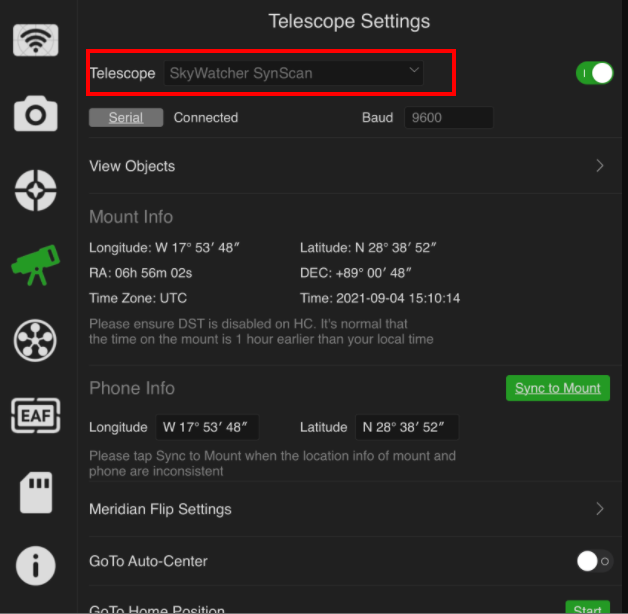
- Settings on the ASIAIR PRO:
- Turn on ASIAIR PRO
- Open ASIAIR App on your mobile device
- In the ASIAIR App open the Telescope settings
- Select Skywatcher SynScan as telescope
- Toggle the connect button
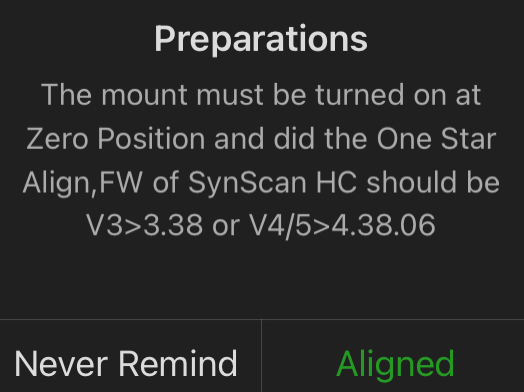
- Confirm the Preparations Warning:
- The settings used for a SkyWatcher EQ6R-PRO Mount should look like this:
Created with the Personal Edition of HelpNDoc: Keep Your Sensitive PDFs Safe with These Easy Security Measures