|
PixInsight - Comet Processing
|
Option d) Creating a Comet Video Clip Using the Blink Process and ffmpeg

|
updated: 2026-03-01
|
|
Purpose
|
This PixInsight based procedure can be used to assemble a series of pictures into a one small video clip.
Basis for a successful video clip creation are:
- There should be no interruption or pause between the individual frames, or at least the pause between the individual images should always be of the same length
- Unfortunately I missed to deactivate dithering and additionally a Meridian Flip occurred after 26 exposures, but this was unavoidable.
The procedure is based on a set of exposures take on Feb. 8, 2023 of the C/2022 E3 comet. Of the original 100 frames captured, 2 frames (#79 and #80) had to be discarded due to a short guiding problem (reason was probably "a star lost" error due to variations of the sight conditions). The resulting video clip is available on Starlust - Photos
The post-processing was done in following steps:
|
|
Activation
|
see below
|
|
Input
|
Original light frames from subfolder "Light"
|
|
Output
|
An AVI or MP4 video file in subfolder with "Video/selected/rotated/debayer"
|
|
Previous Step
|
|
|
Next Steps
|
|
Step
|
Description
|
Action
|
|
1
|
Pre-select good frames with Blink
- Process 🡺 All Processes 🡺 Blink
- see this description how to use Blink
- Move all good files to the subfolder ..Video/selected
|
|
|
2
|
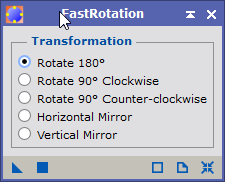
Rotate wrong orientated frames with Fast Rotation (optional)
This step is required in case your equipment had to do a Meridian Flip during the capturing session.
- Process 🡺 Geometry 🡺 FastRotation
- follow the steps described in the chapter Bulk Image Rotation
- Set the output folder to the subfolder ..Video/selected/rotated
|
|
|
3
|
Apply the Debayer function
- Process 🡺 All Processes 🡺 Debayer
- Apply the debayer function to all rotated frames, see the Debayer Function descrpition.
- Output all debayered frames to the subfolder: ..Video/selected/rotated/debayer
|
|
|
4
|
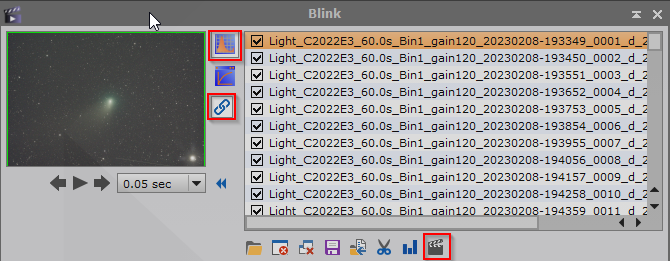
Open Blink again to generate the video file
- Process 🡺 All Processes 🡺 Blink
- activate Apply automatic histogram transformation for all frames.
- Do not activate Compute Auto STF if the quality of the images are too different (changing sky quality over time)
- Click on the film icon
 to open the video converter window: to open the video converter window:
|
|
|
4a
|
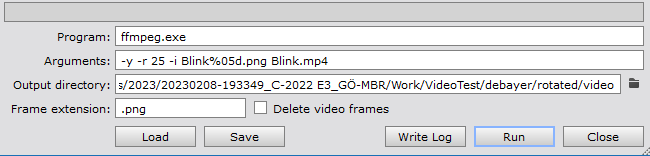
Blink Video Converter Settings
- Program: ffmpeg.exe (must be placed into the PixInsisght \bin folder to work)
- Argument examples:
- -y -r 25 -i Blink%05d.png Blink.avi for AVI files
- -y -r 25 -i Blink%05d.png Blink.mp4 for mp4 files
- Framerate: 25 fps, no downscaling applied, scale: 4144x2820 px
- Resulting video file has a size of 234 MBytes (using 98 frames of 4144x2820 px)
- -y -r 10 -i Blink%05d.png -vf scale=1280:800 Comet.mp4
- Framerate: 10 fps, Scale: 1280x800px
- Resulting video file has a size of 8.9 Mbytes.
- Frame file extension: .png (Blink will generate intermediate PNG files that will be used by ffmpeg for the video file generation)
- Some explanations about the ffmpeg parameters used in the example above:
- -y: Overwrite existing files without asking
- -r: frame rate specifier in frames per second
- -i (url) input: Input files, in this example (-i Blink%05d.png) will use file like Blink00001.png to Blink00099.png
- ( Blink.mp4): is the name of the output file generated by ffmpeg
- Resize: scale=1280:800 output.mp4
- Frames per second: ffmpeg -i input.mp4 -vf "fps=30" output.mp4
- Loop video:ffmpeg -stream_loop 2 -i input.mp4 -c copy output.mp4
|
|
|
4b
|
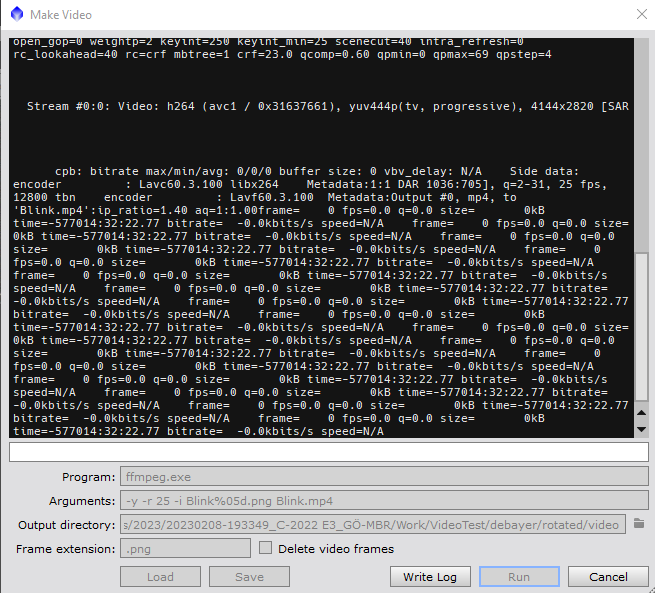
ffmpeg Conversion
When ffmpeg takes over to generate the video file, the processing screen looks like this:
|
|
|
5
|
More Post-processing
If more post processing is needed, e.g. to increase the contrast or saturation, you can use tools like Movavi. This video converter is easy to handle and provides options for many different target video file formats and devices in addition to water marks on videos and contrast and saturation enhancements.
|
|
About the ffmpeg.exe file
There's a good explanation How to install and use FFmpeg on Windows 11/10 (thewindowsclub.com)
On a Windows PC you should download for example the latest release called: ffmpeg-release-essentials.zip from Builds - CODEX FFMPEG @ gyan.dev
Created with the Personal Edition of HelpNDoc: Free PDF documentation generator
